React Native vs. Native
Should I learn React Native or Native?

I get asked this question all too often. I’ve finally conceded that it deserves a blog post. I’m going to (hopefully) articulate my perspective on the classic “Should I learn ObjC/Swift and Java/Kotlin, or just React Native?”
I’m going to answer this common question, but first…
Let’s start with the draw of each; the “why?” that causes the concern.

Benefits of learning Native:
- You’re organically optimized for efficiency
- Your application has a “native feel”

Benefits of learning React Native:
- Your same JS code works on multiple platforms
- JS is simpler than native
- You have access to hundreds of thousands of JS libraries
From a cursory glance, it looks like React Native is the classic trade of quality for quantity, e.g. “Web team X wants to deliver mobile, so they go with React Native.”
That assumption is critically wrong
If you want to emulate native, I highly recommend going after a PWA or Ionic application instead. Those solutions are where you can get something quick and dirty. React Native gives you something different.
So what is the answer then? If React Native isn’t an easy facade, where does it get its power?
React Native + Native

Above is a photo I took in Barcelona, where original Antoni Gaudí models were restored with 3D printed replicas of the missing parts. Using this technology, architects have refined and integrated the native designs of the original vision in a cooperative and stunning restorative piece. A purist might goad, except that Gaudí himself set the tone to his will, “To do things right, first you need love, then technique.” The technique is second, as an instrument that fulfills the will.
In an overly ambitious metaphor, I like to think of React Native working with Native the same way. The grooves where these two distant technologies meet must be flush, balanced, and obey the finality of their structural design. Form following function; optimized for impact in a goal.
To me, React Native is that 3D printed plaster that doesn’t replace Native, but embraces it in stride for a common cause.
How Native is React Native?
It’s directly Native. It’s not like a PWA where there’s a final wall you can’t overcome. It’s not some hidden lever you wish you could pull. In every React Native project there are two folders android and ios, and in those two folders are Native projects. Write all the native code you’d like! BUT, for there to be that balanced structure between the two, you have to make sure that like Gaudí’s models above, that one picks up neatly where the other leaves off.
I’ll prove it: an adventure into Native with code

If all you have to do is call some native code, a function or access a property of the Native API, then the React Native code is trivial. This is child’s play with a system called “Native Modules”. Within minutes you can have native calls running by reading the docs on Native Modules for iOS and Android.
However, for our adventure, I’d like to take it up a notch. Let’s get into an actual, visual, native component, not just functions. You’ve heard React Native components compile down to platform specific components in UI, but how? Let’s just do it ourselves and see.
We’ll write a Welcome component in React Native that we will implement down into Native. That means a UILabel rendered for iOS and a TextView rendered for Android. For simplicity, let’s shoot for this example:
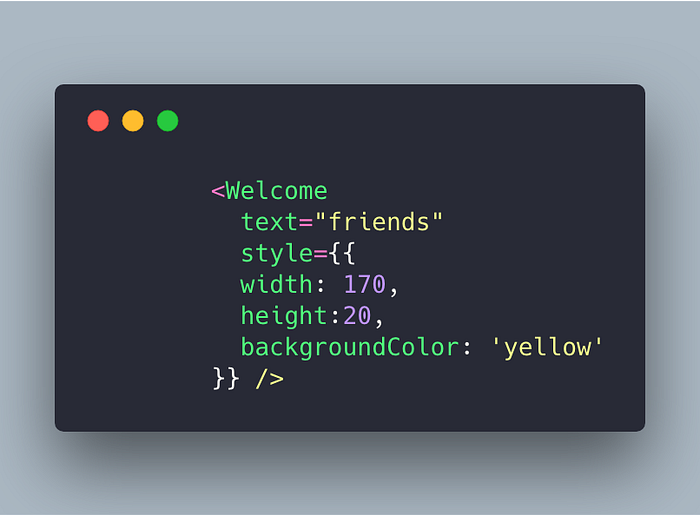
Obviously you wouldn’t use native here except that this is an exercise in brain-building. If you wanted this component to stay pure JS you’d probably toss something out like this:
Let’s see that <Welcome/> looks like if we decide to go down to the metal.
Step 0: The plan
Let’s build our own version of the <Text> component with a customized property for who to welcome. Keep in mind, we would NEVER DO THIS, since <Text> works perfectly fine, but this is an adventure into seeing how it works for a much more complicated component.

- We create an Objective-C wrapper for UILabel
- We create a Java wrapper for TextView
- We treat them the same in a unified JavaScript API
Step 1: The iOS Bridge
In iOS, we’ll add a new file in the ios folder (from Xcode so that the project-file knows about it), and we’ll name it “RNTWelcomeViewManager”
What’s in a name? 🌹
That’s a big name! Why not just call it “Welcome”? There’s a lot to unpack there, so let’s really scrub through the long-winded name and see if we can’t make sense of why “RNTWelcomeViewManager” was chosen instead. As you might have guessed, the prefix RNT stands for “React NaTive”, and serves as psuedo-namespace to prevent conflicts among Native files. The native React libraries provided by Facebook are prefixed with RCT for this very reason. RNT is the suggested prefix for us. It’s also common practice to call this a View as we’re planning on showing it. Next, the word Manager is also common vernacular for identifying this file as the inter-connector between JS and Native. Lastly, in Objective-C world that means a .h file (header) and a .m file will be created. 😅
We can fill our .m file with this:
That’s simple! With a little bit of macro-magic we simply identify what view we want to create. Line 8 makes a new UILabel, we then set it’s text to “WELCOME!”, and return it. DONE!!!
Well, we do want to welcome people by name right? So let’s expose a property that will do just that!
NOTE: It looks like there are random undefined variables ahead, but that’s just a trick.
jsonis provided by the macro.
There! Now we can update our UILabel. We’ve made a property called text, that expects a string, and can expect a UILabel (unused). Inside this macro function we have access to view which is the manager’s view instance. json which is the raw value passed from JS, defaultView which we can use if JS sends us null.
All we really needed was to set the text. We could have set it to json but our component uppercases, and adds to the value. Turning the parameter “friends” into “WELCOME FRIENDS!” If you’re bad at Objective-C, you can probably read the Java solution in Android Bridge which does the same thing.
Step 2: The Android Bridge
Fortunately, we don’t have to open Android Studio. We’ll create two new files inside ./android/app/src/java/com/<project name> folder, right next to your MainApplication.java file. The first file is named similar to our iOS example RNTWelcomeViewManager.java for obvious reasons.
The second file is RNTWelcomeViewPackager.java in this example, is a clean place for you to identify your Manager for inclusion. You’ll also have to edit your MainApplication.java to include this package right after the MainReactPackage() has been listed. For full code, see the GitHub link to the resulting repo.
Now let’s write our view manager code:
That’s it! Lines 1–15 are template setup. Lines 16–21 create a new TextView and set the text to “WELCOME!”, and the lines 23–26 expose a property named text that when set it will update the view with an all-uppercase friendly greeting!
Step 3: Access from JavaScript
Now all that’s left is to load these React-wrapped native elements in JavaScript.
Let’s go back into our React Native project and add a file named WelcomeNative.js and simply paste this code:
💥 DONE! 💥
When we call requireNativeComponent we pass along the name (minus the “Manager” part) and expose it.
It’s worth noting 📝:
- You didn’t have to create
WelcomeNative.ios.jsandWelcomeNative.android.jsas the key files were named the same and the property was coded in Native, not in JavaScript. - The second parameter of
requireNativeComponentcan take a JavaScript component which you can use as a wrapper to enforcepropTypes.
The full source from this article is available for free by the good people of Infinite Red. If you’re interested in consulting or training, let us know.

Bridge Limits
Now you understand the bridge between Native and React Native. This brings up a very clear question, “How hard is it to saturate the bridge into becoming a bottleneck?”
You’ll be happy to know imperative animations can happen across the bridge at 60FPS, so it’s no fool’s gold. However, it’s important to note that the bridge is not impervious to inefficient React updates, or highly-interactive synchronous events. If your code requires significant bandwidth over the bridge, you may need to refactor it on either the Native or the JS side for effective messaging.
TL:DR; Should I learn React Native or Native?
Answer: Use React Native. If you’re 100% new, learn React Native and strive to learn the Native integration as needed. If you’re familiar with Native, learn how to be a maestro with connecting native libraries to JavaScript, and thusly empowering reusable API.
It’s the bridge between the two that empowers you seek benefits from either. Even though I rarely get to jump into native code, when the time arises, it’s not a limitation but an adventure. React Native gives you access to everything you need, but as more travel the path, the road presents itself more clearly. I hope the above examples across Native and React Native have clarified just how simple it can be.
Special thanks to Mark Rickert who always makes time to help me with rusty Objective-C. He’s a good dude.
ALSO: As next steps, I think it’s great to dive into platforms with a guided tour by Vincent Riemer in React Day Berlin. Video not embedded, so you can jump to the timestamp of his talk directly:
https://www.youtube.com/watch?v=tKsaIU0YqLk&t=1683s