React Navigation Drawer Tutorial — Part 2
How to customize a DrawerNavigator in your React Native app using react-navigation
This is the follow-up of the drawer tutorial. In Part One, we covered adding react-navigation to your project, wiring it up to redux, and placing a default drawer in the app.
Our goals of Part Two include two new steps that add finesse to the drawer. Continuing the numbered steps from our first post, our outline is below.
Step 3:
• Customize drawer labels
• Fix drawer toggle
• Fix login animation
• Stop gestures from breaking login flow
Step 4:
• Make your own custom drawer component
• Add logout feature to drawer

Step 3: Enhancing the Drawer
First Workflow Fix: Customize default menu labels
Though screen1 is a badass name for any screen, it’s not very pretty. There’s no reason to be restrained to the key. We can modify our names in navigationOptions either at the routes level or inside each screen.
For screen-specific options, I like to keep that in the screen. So modifying screen1 is done with adding options like so:
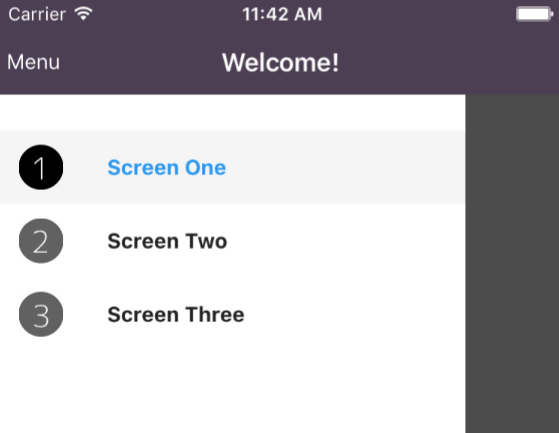
Doing this for each screen gives us a new label in the drawer.

You can also give a drawerIcon for each menu item; let’s do it. We start by supplying the component you’d like!
Result of adding the above to each screen:
Second Workflow Fix: Stop double drawer open
You might have noticed, if you click the menu, the drawer opens… but if you click it again, the drawer disappears. A third click… and nothing will happen in your app now. You can’t open an open drawer!
We have to fix this by modifying the onPress to our menu in the drawer. Now it will close or open depending on drawer state, like so:
It might seem dirty to check the drawer state’s index to figure out if we should open or close, but the good news is that I have a PR submitted & merged to relieve us of this complicated mess. Hopefully, soon, we can switch to using navigate('DrawerToggle') and let the drawer do the right thing.
Third Workflow Fix: Pushing Drawer Dirt
You might have seen it if you’re playing along. When you navigate from a screen without a drawer, to a screen with a drawer, the drawer is visible in the push animation.
Carefully observe the following gif and notice that for a moment the drawer can be seen while navigating!
I’m not a big fan of animating login navigation anyway. Even if this bug gets fixed, you might agree, there was no need to animate this change. We can kill the animation here with a custom transitionConfig passed to the top stack. People are coming up with new ways to do this, but until these are done, you can do it like so:
Fourth Workflow Fix: Stop gestures!
As you might guess, gestures aren’t going to be your friend with a login stack in recent history. Swiping backwards brings you back to your old login screens. By default, gestures are active everywhere.
An accidental swipe by your user and 💥 poof 💥 you’re on a screen you didn’t want users to access.

Each stack can take navigationOptions for disabling gestures, with setting gesturesEnabled: false. I recommend doing this on the stack containing the drawer (to stop swiping back to login) and doing it on the drawer as well for solidarity.
Everything thus far:
The resulting navigation stack for containing all of the above looks like this:
Let’s give it a test drive.
Everything looks great!
- ✅ Signin/up Navigation Stack
- ✅ Logged In Header /Navigation Stack
- ✅ No gesture backtracks
- ✅ No login push animation
- ✅ Custom Drawer Labels and images.
For a moment you feel like you’re in control, but you’re not…. You’ll outgrow defaults.
The default drawer is ideal for a hackathon, but we’ve got to have FULL control of what we’re going to show in that drawer.
This concludes Step 3! Review the full code for Step 3 here: https://github.com/GantMan/drawer-example/tree/step3

Step 4: Customize it all
Customize the drawer with our own component
A default drawer works just as good as a default screen. It’s time to customize and take control. One property of the drawer configuration object is to set the contentComponent to a custom component. We’ll be doing this:
contentComponent: DrawerContainerWe now have the power to manage the drawer with our DrawerContainer component, which consumes navigation props. With custom component for DrawerContainer we’re ready to rock! 🤘
Here’s a beautiful component:
Here we go!

This gives us the ability to add non-stack buttons to our custom component. Let’s add logout!
Add Logout to Custom Drawer
Now that we have full control, we need to be able to navigate to login when they click logout. To do this, we’ll need to do a reset, but the reset won’t be in the current stack, it will be at the top level.
There are two ways to do this. One logical way is to pass the parent navigation down to the children stacks so that each child stack has a reference. This is how you’ll have to do it if you avoid Redux.
Fortunately for us, we’re using Redux, and so we can dispatch a Reset action. Our dispatched reset will have a key: null which will allow us to navigate up from this nested stack. Our logout function looks like so:
For more info on key: null dispatch up the tree, see github issue 1127.
Dispatching to our redux-friendly navigation is all we need! Now we easily add a button to call our function from the drawer and voila!
This concludes Step 4, the final step! Review the full code for Step 4 here: https://github.com/GantMan/drawer-example/

Lots of apps have navigation drawers, and plenty of those drawers are behind a wall, usually login. With the information in this blog post, you should be able to build a drawer that fits your own intricate needs. Each of the major four steps is available on Github with tags: https://github.com/GantMan/drawer-example
Further reading: If you want to highlight the currently selected screen element, you can do so by accessing this.props.activeItemKey from your custom component, and modifying your styles accordingly. I’ll leave this part as an exercise to the reader. You can do plenty more, too. See how the default DrawerItems are constructed in the source code here, and you can then access all the properties you may need to finalize your custom drawer.
Blog Credits:
- Special thanks to Lorenzo Sciandra for his help.
- Graphics and blog aesthetics by Jenna Fucci.
- Blog article by Gant Laborde.
🎉 About Gant
View technical tweets and puns with @GantLaborde on Twitter, or follow him on Medium and GitHub. You can see where he’s speaking next on http://GantLaborde.com/
Gant Laborde is Chief Technology Strategist at Infinite Red, published author, adjunct professor, worldwide public speaker, and mad-scientist in training. Read the writings of Gant and his coworkers in our Red Shift publication or invite him to speak at your next conference.