Switching from Ava to Jest for TypeScript
The Why and How I switched my testing framework
Why:
You might love Ava as a testing framework. We know we did! We still kind of do. It’s an ache that we won’t soon forget, but in the wacky world of JavaScript, things change every day. We need a way to change quickly with it.
The change started with us. We fell in love with TypeScript. I’m not sure if you’ve taken a moment to really give TypeScript a candid investigative prod, I recommend this video if you haven’t had the pleasure, but TypeScript is part of what we use hand-in-hand with testing to ensure a stable product.
The real benefit comes from the integration into our editor! Instant red-line when we’d have an error that would crash; what a time-saver!
That’s when the change started. We needed tools who were willing to play along with our tools. New passions need to be fed.
Over a year ago, someone tried to blaze the trail for TypeScript and Ava. This epic Github issue ensued.
Fast forward to current day; I’m working on Solidarity with testing in Ava. I decided (after consulting with Steve Kellock) the project should be converted over to TypeScript. Faced with no great way to really understand my Ava test coverage, it seemed like it was time to make a game plan and do the swap to Jest. In Jest, I could move to 100% TypeScript on TypeScript testing, with coverage reporting that would be accurate.
UPDATE: Since this article was written — ava-ts is now a thing. Please give it a try or star the repo! The rest of this article is how easy it was to switch to Jest (if that’s what you feel you need to do).
How:
Here are the game plan objectives:
- Convert AVA to Jest tests with code mods
- Get the tests Green as fast as possible
- Change coverage reporter to work with Jest
- Change everything (Tests and Tested) to TypeScript

Convert AVA tests to Jest tests
Converting all tests over to Jest sounds like a fool’s errand. There was a great tool called jest-codemods that tries to automatically convert tests from many architectures to Jest.
Implementing this was easy, as it’s built on the jscodeshift toolkit.
$ npm install -g jest-codemods
...$ jest-codemods
The CLI walks you through the steps. Below is a screenshot from my machine.


Install and get tests green!
I have Jest tests, but no Jest testing engine. I need to add it and move my tests to the designated testing folder name.
# install jest in dev
$ yarn add jest --dev
# OR `npm install --save-dev jest`# move tests to where jest will look
$ mv tests/ __tests__# run it and see what happens!
$ yarn jest
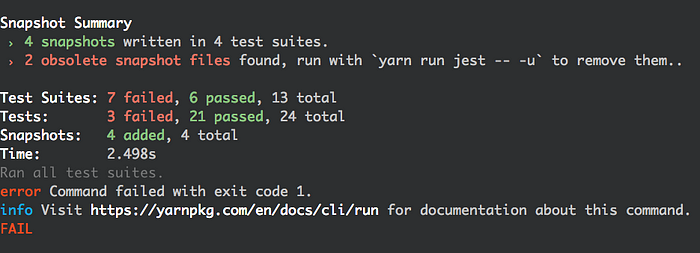
Let’s Fix those failing tests
Delete all your old Ava snapshots folders; those don’t make sense anymore. Update and get Jest-styled snapshots, and then let’s finish with cleansing.
# Delete old snapshot folders from AVA
$ find . -type d -name snapshots -exec rm -rf {} \;
...# get jest snapshots now (the -- is deprecated now)
$ yarn run jest -- -u
...# not sure why, but I had to make my `node_modules` right
$ yarn
...
That quick update knocked a few things loose, and I was down to only two failing tests. One is failing and the other timing out.
First fix the failing test: The converted code made a mistake on how the Jest API for checking errors actually works. Updating the code to check for the error correctly fixed it.
Second fix the time out: It looks like the converter forgot to call done() in two async methods, which caused them to never realize that the tests were successful. Therefore the tests sat until a timeout was reached. Adding done() in those two spots fixed it!
For those of you looking to pad your open source profile, the above issues sound to me like two easy bugs worth fixing in
jest-codemods.

Handle coverage report
Another great thing about Jest is that code coverage is built right in. You can get coverage by typing yarn jest --coverage with no extra bells or whistles.
After adjusting my yarn coverage script, I did have to edit my .travis.yml to run my new reporting command and send it to codecov.

I’m not sure why I expected this to be difficult, but it’s way easier than it ever was to setup nyc by hand the first time.

TypeScript all the things!
By adding ts-jest and configuring Jest to use it, I was able to write and read my TypeScript. Start by installing the dependency.
yarn add ts-jest @types/jest --devNow we add the Jest configuration to the package.json file. This is verbatim from the ts-jest readme doc.
With that, I was able to convert all my tests to be .ts files, and then point them to the /src folder instead of the /dist folder. Running a yarn jest --coverage officially gave me real coverage! That’s it; I’m done!

Though all my tests passed with flying colors, the very next run I did would fail. Then it would work/fail/work/fail/work… I was so baffled! The answer was a combo of Jest cache and TypeScript. Cool feature, but it’s not 100% ready for pre-processor plugins. Be sure to run your tests with --no-cache when using TypeScript. OR pass the --ci flag, which will run in a single band and without cache. I’m sure this will be fixed soon(probably before I release this blog!).

Within an hour, I was able to convert my codebase to Jest and fully take control of coverage! Yes, my tests were no better than they were a moment ago since I haven’t utilized the benefits of strong typing yet, but the project and my coverage was converted successfully!
I hope this article helps you modify your testing framework if you so choose.
🎉 About Gant
View technical tweets and puns with @GantLaborde on Twitter, or follow him on Medium and GitHub. You can see where he’s speaking next on http://GantLaborde.com/
Gant Laborde is Chief Technology Strategist at Infinite Red, published author, adjunct professor, worldwide public speaker, and mad-scientist in training. Read the writings of Gant and his coworkers in our Red Shift publication or invite him to speak at your next conference.


