Simple React Native Android Releases
Releasing your React Native App to the Google Play Store
We blogged about how to release your iOS app to the iTunes Appstore with React Native in a simple and team-efficient way. We’ve always considered writing a How-To for Android, but it’s always seemed so much easier. True, but is that a good excuse? Nope!
At the end of this article, you will be able to type a command and walk away while your project prepares itself and ships to Google Play. Your release process will be quick however setting up this release process contains many steps so you should set aside at least one day for setup.
Pre-requisite — Install fastlane: Got Ruby? Get installing! It’s global!
$ sudo gem install fastlane --verbose
$ gem cleanup # optional recommended
Finally, here’s the Infinite Red way to release your React Native Android app to the Google Play Store.
- Create a place of secrets for your team
- Create a key and sign a build of your app
- Setup API access to Google Play
- Initialize app on Google Play
- Setup fastlane for Android
- Automate awesome stuff!
Let’s go down this list and knock out a release lane that will deliver our app to Beta testers from the CLI.

Create a place of secrets for your team

I know it sounds like extra work, but if you EVER plan on putting this project down, and coming back to it, this is a lifesaver. Every project we release gets a “Keys to the Kingdom” repo, where we store API, Encryption Keys, Passwords, JWT Token files, and more. It’s critical to have a sane manifest for all the secrets a modern day application requires. Additionally, these things can change, and your team needs to know where to go for updates.
I’ll mention the secrets repo twice in this blog, because there are no less than two secret files necessary for Android alone. If your main application is worked on by many team members, or is even open source, a separate and even linked private repo helps everyone know who to ask. Only those with access to your private repo configure the app for release.

Create a key and sign a build of your app
The first thing you’ll need to do, is be able to create a signed APK.
This differs strongly from iOS, where Apple serves as a signing authority. Though Android has recently enabled this service to mimic Apple, I still find creating your own key easiest.
Fortunately, all the steps to generate a key and use it to sign your Android app are extremely well-documented by Facebook. I would be remiss to re-write the docs provided by React Native here. Perform the steps specified and I’ll catch back up when you’re done.
🗝🔒 — Store your keystore file, password, and alias in your secrets repo from step 1, so people other than you can deploy the app if you go on vacation.
Be sure to add the keystore to your .gitignore so it is never checked into version control. Once you publish with this keystore, you can’t lose it without losing the ability to update your app in the Play Store, so keep it safe!
If your release builds just fine, congratulations! Skip down to step 3. If not, I often see two problems. Here are my fixes:
If your release build fails due to an “multiDex” problem, you simply need to ./gradlew clean and you should be good. Every so often you might be held back by something as silly as linting errors.
LINTING ERRORS!?!
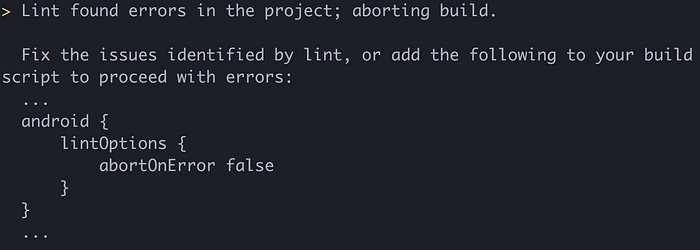
Isn’t the idea of React Native that I don’t have to muck around in Android syntax unless I WANT to? Fortunately, the output provides a “solution” to remove linting errors. Add the following under buildToolsVersion line in your ./android/app/build.gradle file.
// Android gonna droid
lintOptions {
  abortOnError false
}
This works great, unless you’ve brought in a third-party lib that ALSO has linting issues. Now you’ve got to run around and add this to every build.gradle, even the third-party libraries in node_modules which fail to lint properly.
A better solution is to turn linting off for everybody. Add this to the bottom of your ./android/build.gradle and all your dependent projects will avoid linting as well.
TADA! 🎉🦄👍💯 — Besides multiDex and linting, you should have a successful build created from ./gradlew build. This generates ./android/app/build/outputs/apk/app-release.apk, which is a production-ready, zipaligned, and signed APK.

Setup API access to Google Play
Why?
This tutorial is about setting up a CLI deploy process. Ideally, we type a command and we walk away. To do this on Google Play, we need help from the account owner, NOT the manager or developer, but ONLY the owner. This is always a headache. Otherwise you will see this message:

Once you have the account owner on a screen share, or have their login information, the generation of the JSON file is very simple. The docs on fastlane work great right here, but be sure to jump back to this blog once you finish the “Collect your Google Credentials” section (15 steps as of this writing).
Got that magical JSON file? Good! Let’s give it a reasonable name that is consistent across projects, so rename it to google-play.json.
🗝🔒 — Store your JSON file in the secrets repo from step 1. It’s essential to whomever will deploy the app, and that might not ALWAYS be you.
Copy the file to the root of your project and add a reference to .gitignore

Initialize app on Google Play
If you’re following the instructions on fastlane docs, instead of following along with us here, there’s a chance you’re staring at this.

To create the package on Google, we need the APK created in step 2 to be uploaded. First, click the “Create Application” button.

You don’t need to give a large amount of detail, just enough to generate a draft. When the draft is complete, we will then upload our signed APK to register the package name.

1. Click “App Releases” on the left side menu.
2. Click “Manage Beta”.
You can then drag your signed release APK to the upload APK box. It will list it with “Version Code 1” in the list.

When you click the “Review” button on the bottom right, you might have a successful APK, or you might see errors. One common error I see is the requirement of a privacy policy in the store listing.

^ To fix: Go back to your “Draft” in the Store Listing and add a link to the privacy policy. Congrats, you fixed the review error and should pass now.
When you see this message after clicking review, you’ve successfully uploaded your APK and registered the package name!


Setup fastlane for Android
Jumping straight in with running the fastlane init script for Android.
$ cd android/
$ fastlane init
Package Name located: ./android/app/src/main/AndroidManifest.xml with package name (around line three).
If you named the JSON file like we suggested, and placed it in root, the setup of the JSON secret looks like so.

Once init has finished, we’ll run fastlane supply init as well.

Now we can setup our beta release lane!
When you open your Fastfile/Appfile, it’s just Ruby. Your editor won’t think so by default, which means no syntax highlighting. For all you VSCode junkies out there, you have two choices. One is to install this extension in VSCode. The other is to make the editor associate Fastfile/Appfile with Ruby.


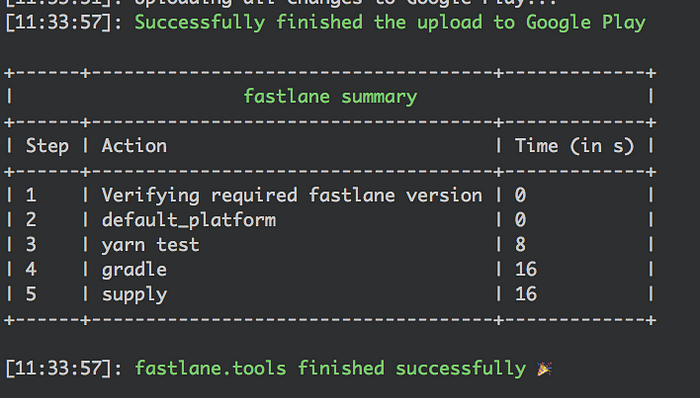
Your Fastfile will likely have a flavored version of Beta, which I suggest swapping out with this:
This script runs tests, builds a release, and then uploads the result to Google Play’s beta track. Because of that, you don’t need to bump versions.
You can add a simple script to your package.json to run this from Yarn. I suggest something simple like:
"scripts": {
  ...
  "beta:android": "cd ./android && fastlane beta"
}
Now that everything works great, let’s get cracking on some bonus features!

Automate awesome stuff!
Though you might consider the task complete, it’s important to know you can/should go a little further. With a few plugins you can automate simple tasks that will save you plenty of time.
We’ll add two plugins to make our app release process top-notch. We’ll automate version number changes (essential for production releases), and icon resizing.
Let’s add our plugins.
We start with two commandsfastlane add_plugin increment_version_code in our android folder, and then fastlane add_plugin appicon.


Now we can use our two new plugins in our lanes. I created a new lane named gamma which will do everything beta did, but now we’re using our plugins.
Create a folder in the root named AppIcon, and place a 1024x1024 image named IconAndroid.png which we will use to make all the icons automatically.
Gamma looks like so:
On line 8, we will bump the version for Android.
On lines 11–15, we will re-generate our icons for phone and tablet based off of a larger image. So we can change that one image, and all our smaller images will get created.
We can kick this off with simply running fastlane gamma from the android folder.

If you’d like to add other plugins, you now know how! Browse the plugins list.

You can now type yarn beta:android or yarn beta:gamma and walk away! We’ve automated the pre-processing, build, upload, and the delivery. Because of the secrets repo in step 1, you can even offload the process to a trusted team member.
If you discover any amazing plugins, please share them here in the comments.
If you enjoyed this article, feel free to hold down the clap button to say thanks!
About Gant & More 🎉
View technical tweets and puns with @GantLaborde on Twitter, or follow him on Medium and GitHub. You can see where he’s speaking next on http://GantLaborde.com/
Special thanks to Infinite Red, who support Gant in writing blogs for the community. Infinite Red is an app design and development studio based in Portland and the Bay Area.
Gant Laborde is Chief Technology Strategist at Infinite Red, published author, adjunct professor, worldwide public speaker, and mad-scientist in training.
Read the writings of Gant and his coworkers in our Red Shift publication or invite him to speak at your next conference.