Fastlane — Simple React Native iOS Releases
React Native App Store Deployment & Zen

“COMPUTER! RELEASE THE APP!” — Outside of Hollywood, this usually doesn’t work. Today, it pretty much will. With the release setup in this article we can make App Store deployment effective by making it simple. There’s no reason you can’t show updates to clients in the same ease and speed of web. Though you can use fastlane quite easily for Android as well, for brevity, we’ll be covering the iOS App Store.

Historically, as I release apps to the App Store, I relive some kind of scholastic, math-test nightmare. I instantly forget everything and take solace in the fact that it will only hurt for a bit. For too long, we’ve blamed developers for not memorizing an ever-changing, multi-day partial process that is app publishing Hell!
“Don’t complain, create.” — Tina Roth Eisenberg
We’ll be going over the specifics for releasing a React Native application on the iOS App Store or Testflight in a simple and reproducible way. “BUT WAIT!” you say, “Won’t it just CHANGE and render this blog post useless, like the multitude of other posts in the wild?” Nope! Enter the hero:

Consider fastlane (and included commands) as a dynamic and automated go-between. With a proper fastlane setup, you won’t just be set, you’ll be adaptable! As the process for the online store changes, the commands I type at my terminal do not. We’ll only cover the key tools to get you started.
App Release Big Picture — 3 Goals
- Do the App ID security/certificates dance with Apple 💃
- Secure the certs & provisioning profiles for the team 🔐
- Bump versions and send them to Apple (99% of what we do after today… Seriously, I type npm run beta to release apps to clients for testing.)
It’s really that simple. Fastlane helps us with step 3, and surprise! It helps us with step 2! But WAIT! There’s more, annnnnd with step 1, too. Man, I love this tool. You can now manage your accounts, testers, and versions from the terminal!
The steps below accomplish the aforementioned goals
Step 0: Get Apple Access and fastlane
Apple Access: You’ll need access to 2 sites:

https://developer.apple.com/account/ — For certs etc.
https://itunesconnect.apple.com — For app store access
Pro Tip: It USED TO BE, you could only have 1 unique email for developer.apple.com, but that has changed. If you used to use iosdevs+theirCompany@yourCompany.com you don’t need it to be unique anymore. Both Apple and Fastlane support multiple organizations.
Install fastlane: Got Ruby? Get installing! It’s global!
$ sudo gem install fastlane --verbose
$ xcode-select --install # ensure x-code command line tools
$ gem cleanup # optional recommended
Step 1: Identifiers, and Profiles, and Certs — OH MY!
No more manual process for app setup! The entire process of creating, encrypting, and sharing with your team has been solved. One of the MANY tools you get with fastlane is called match. Using match, we have a simple terminal setup process that results in an encrypted and versioned code signing identity for your dev team.
Developer teams often share keys in non-uniform ways. Match will add sanity to this process and encrypt the credentials.
Q: How should I think of match? What does it do?
Match actually uses several other tools under the hood, but only when needed. It’s like a setup wizard more so than a command. It detects and asks you steps along the way, so I’m not going to say much more than it gets your App Store setup and your local setup coordinated.
First time running, so we create our match file with:
$ fastlane match initThis system stores your certs/profiles, and is capable of storing them in a variety of locations!

We’ll choose git in this tutorial, but it’s simple enough to store anywhere else you might like!
This asks for the git repo where we’ll be storing our certs/profiles. Follow the steps to completion. As of this writing USE A NEW PRIVATE REPO!
Make sure you set your new repo to private and supply the URL to the CLI.

Go identify your bundle id. To do so, open your project in Xcode, go to properties, and look for bundle identifier.
IF you have not created your app id on these two sites (mentioned in step 0), you can use produce to create them quickly now. If your iTunes account is a different username you can skip itunes with the -i flag.
fastlane produce -u <your user email> -a <your bundle id>This will probably ask you to provide your 2 Factor Auth

IF YOU HAVE ANY ISSUES — Read the error message carefully. I’ve had this process denied due to “name is already taken” as well as cryptic “failed” messages which meant I needed to go sign new Apple paperwork.
Now we run the command that makes everything work. It is important to note, this is the command you would run on a new computer or new developer’s computer, too! Run through this process and enjoy. If you get stuck at any point, you can always quit and handle things manually.
$ fastlane match appstoreThis will log in to your accounts, and walk you through the setup process:

For now, we will not do any of the fancy options, like using ‘deliver’ for screenshots. Respond, no, if it asks.
This will prompt you for the password to encrypt your certificates. Be sure to use something you can remember, otherwise you’ll have to start from the beginning!
Pro Tip: Do not use an existing repo. Your README.md will be clobbered when you push your certs and match will likely stop working. Provide a repo JUST for your certificates. Managing permissions to that repo will manage who has access within your team.

Take a moment and look over the generated files and keychain changes.
Step 2: Fastlane itself
With certs in place, we have to generate our delivery script, before we can start working on it. Much like match, we can now initialize fastlane.
Change directory to the ios folder and get started.
$ cd ios
$ fastlane init
Now we’ve got a fastlane folder and Fastfile Ruby script. This comes with a nice “LANE” already set up.
You may need to open Xcode again and select/login to your team to enable proper signing capabilities in the CLI
Pro Tip: If there are multiple apps for this company, make sure your Appfile has identified the correct one.
The README.md that was generated in the fastlane folder will be autogenerated every time you modify and run from your Fastfile, to keep documentation current.
Clean Code Tip: You can move your Matchfile into your fastlane folder, and it will still work. Cart before horse problem. i.e.
mv ../Matchfile ./fastlane
Now, we customize our Fastfile. In theory, my ideal lane would do the following:
A. Prompt user for info immediately so we can ignore script progress.
— We accomplish this with Ruby and Fastlane!
B. Verify everything we want: latest provisioning, tests pass etc.
— We use match to keep profiles up to date & use Ruby to run scripts/tests
C. Increment build number (requirement of Testflight).
— We utilized the increment_build_number method
D. Build a release.
— We accomplish this using gym method
E. Upload release.
— We use the pilot method
F. Notify me when when you’re done.
— I love the slack method for team notifications
Pro Tip: A Fastfile just calls a series of fastlane tools in concert. You can call these tools individually from the terminal, too. This allows you to experiment, and construct new Fastfile paths without re-running everything.
To accomplish this, we will need to modify our Fastfile in the fastlane folder. A perfect Fastfile lane that accomplishes the above:
UPDATE: When I first wrote this blogpost the fastlane API was different. The old blog post fastfile can be found here. The following is based on the latest (as of this revise)
Swapping out the default beta lane for the one above works great. Be sure to change out AppName for the appropriate parts in your personal application.
💥BOOM💥 That looks like a great release script! Though it’s tailored specifically to React Native in a few ways (project paths, etc.) it’s quite standard for any mobile shop! We can run our fresh lane with fastlane beta, but it’s not going to work just yet. We need to tweak our build.
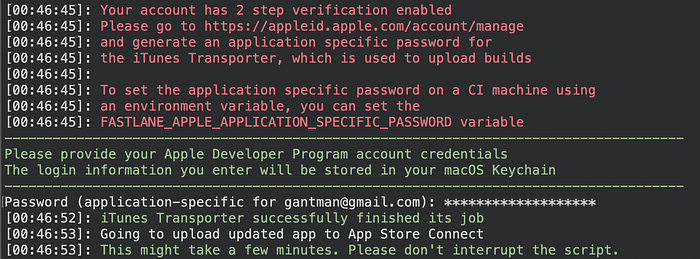
You might be instructed to setup an application-specific password on https://appleid.apple.com/account/manage — if so, please do so.
Step 3: Tweak our XCode to be “acceptable”
Setup basic info:
In Xcode, make sure your Identity and Deployment Info are set under project’s General section. Your bundle identifier must be correct, and your deployment target must be set. Strange that it’s not by default; even stranger are the errors it causes.
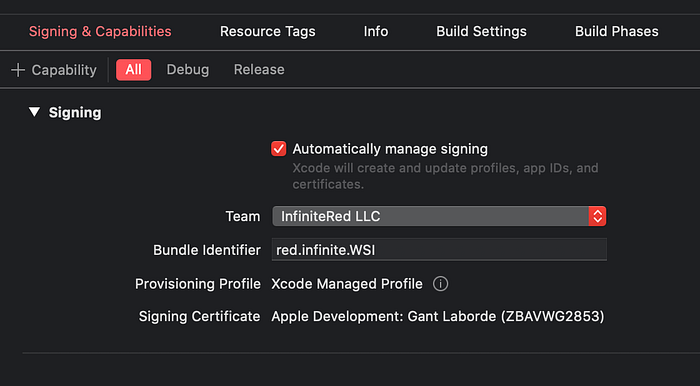
Stop Automatic Manage Signing:
Lately, Xcode is trying to manage it’s own signing. Turn this off:

And then under Signing (Release) be sure to choose your match Provisioning Profile of the app. This will keep everything flowing through Fastlane
Add Icons: WHAT!?
Yeah, seriously. If you don’t have an icon, your upload will get rejected. It’s time for you to get icons in your React Native app.
There are awesome fastlane plugins that will do this automatically for you!!!
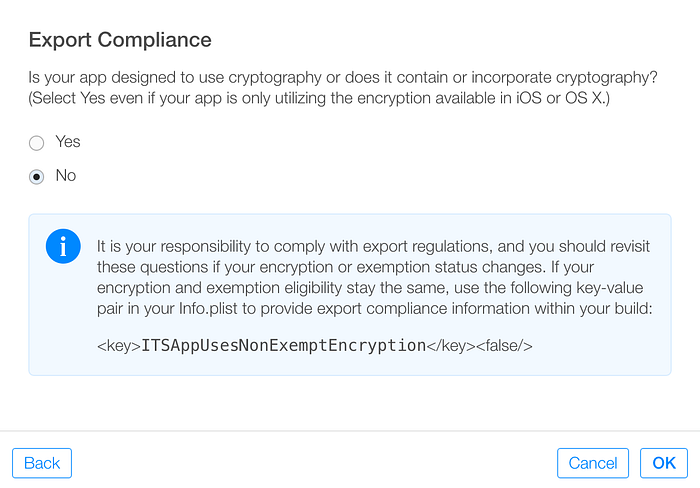
Identify Encryption:
Formerly a business level step, you now have to add an entry to your Info.plist stating you will not violate export compliance. The key is <key>ITSAppUsesNonExemptEncryption</key><false/> which will allow you to ship your app and avoid a compliance blocker (AFTER UPLOAD!).
Get rid of packager network dependency: For < 0.30.0 React Native
Now that your app can get uploaded, it shouldn’t be looking around for localhost port 8081. The latest React Native will automatically know. But if your project was started before 0.30.0 we can add a simple preprocessor directive to our AppDelegate.m code. This will take care of dev AND release conditions.
Get Slack notifications working:
Out of the box, you get terminal feedback during the entire process:

Terminal is great for you, and Testflight emails are great for testers, but the dev team probably speaks slack.
Get your secret slack API webhook url and either add it inside your script, or set it up as an environment variable. You can send yourself messages as often as you like! To get your webhook URL ask your team managers or create your own here!
TADAAAA!

Now you can type fastlane beta to send your app to iTunes! Internal testers will get an email when the app process is completed, and you should see the announcement in Slack. Deploy with a simple command!
Short Encore
Fastlane is well maintained. Kudos to Felix Krause et al. The tool has many deployment bells and whistles beyond this article that are worth reading. Additionally, fastlane is subject to break at the whims and additions of Apple’s interface. The advantage, of course, is that the community quickly comes together to fix these issues expediently.
About Gant
Gant Laborde is Technical Lead at Infinite Red (⚙ web and mobile app dev ⚙), published author, public speaker, and mad-scientist in training. Read the writings of Gant and his co-workers in our Red Shift publication. If you’re looking to discuss nerdy tech, he’s all ears. View half-witty half-groan technical tweets with @GantLaborde on twitter.