React Native Final Steps
A Checklist before you ship your React Native app in 2020

I turned to Twitter to see what I should write about next, and after over a hundred votes, the winner was to finish this blog post!
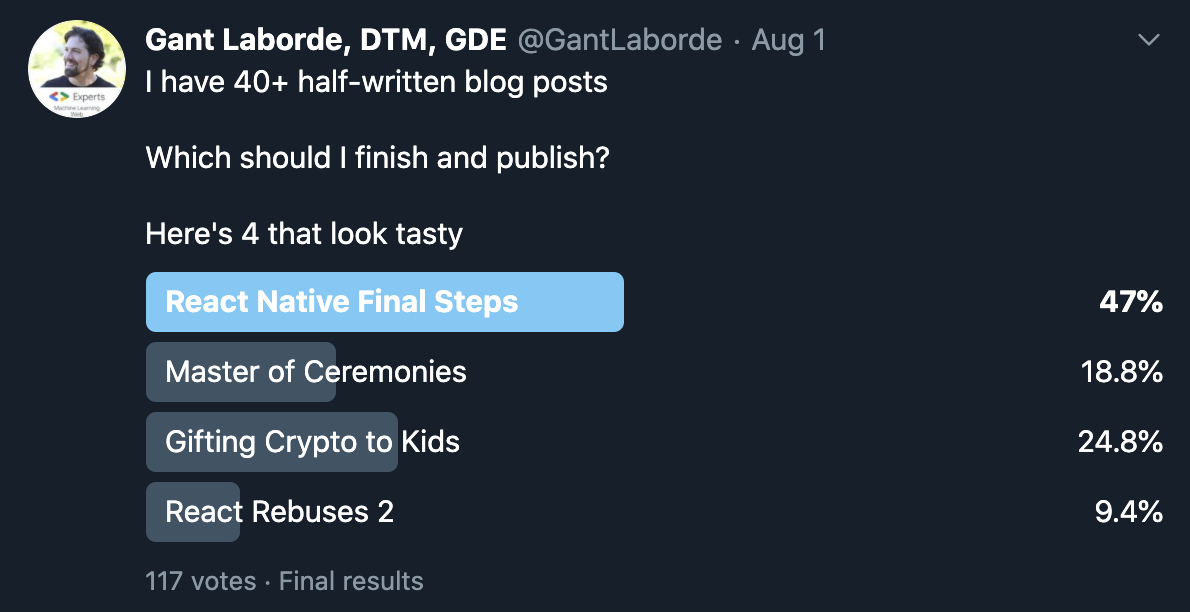
So you’ve finished your React Native app, and you’re ready to ship it out the door. What’re your final steps? No, we’re not going to cover silly answers like “make sure your tests pass”, or “time to add smoke tests” (what does that even mean?). We’re going to cover concrete final steps. Some answers are just obvious, like “push to the app store for iOS and Android”, but is that all there is?
We ship apps all the time at Infinite Red and understand this pain all too well. So let our wisdom be yours! And yes, like with any “Final Steps” blogpost, some of the steps might have been better if considered well before you ship your app. As long as you get them done, right?
Before you ship your React Native app:
- Remove console.logs
- Squoosh Your Images
- Remove Default Android Permissions
- Consider Enabling ProGuard & Hermes Engine
- Quality Assurance Walkthroughs
- Check Startup Speed for Performance Issues
- Bulletproof Your App
- Re-enable ATS
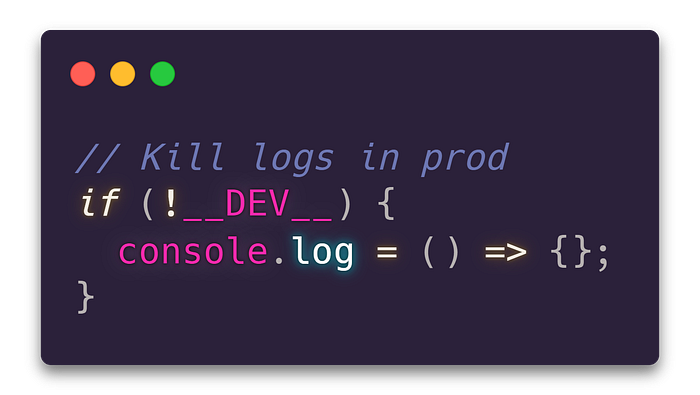
1. Remove Console.logs
As you might or might not know, including console logs can slow down your React Native app. You should scrub them all on their way out. Sure, you could just do a find/replace, but some of those logs took a long time to construct, and provide useful debugging. Probably, you’ll want to keep them in your code, but simply remove them from the production builds. Let’s focus on that.
The Official Way:
“Why doesn’t React Native remove all console.logs when you ship?” you ask? Good question. The recommended method by React Native docs is to use the babel transform npm i babel-plugin-transform-remove-console --save-dev . Then to set or create a .babelrc which can remove them all from your code. This will scrub your console.logs from the production bundle. The .babelrc should contain:

The Unofficial Way:
When you’re in dev mode, the __DEV__ variable is set to true. So you can use that to mute logs. This is simple and gives you granular control if you want to block .error etc, too. I imagine you might, but just in case.
I generally place this in my index.js
Q: But Gant! Doesn’t if (__DEV__) get stripped out by metro in a release?
A: I’ve tested it, and this “NOT DEV” check makes it through to a prod release.
As a benefit to the Unofficial system, you can make that original log function do anything useful you may need. So, if the info is there for a good reason you can reassign the log handler to push to any analytics reporting tool of a 3rd party service. It depends on the usefulness of your logs if you want to redirect them or just null them out.
Regardless of your method, make sure you don’t keep the console.logs, as they will slow down your production build!
2. Squoosh Your Images
You might already have a system in place that automatically optimizes your assets, but let’s make 100% sure you’ve squeezed and resized your images for optimal package size. I generally open up Squoosh.app and drag each asset to the site for visual inspection and verification. This allows me to play with multiple compression techniques and verify I’m not ruining the quality of the images at the same time.
This quick bit of accounting might even find an image that can be resized or deleted outright! This is probably one of the easiest tasks, and it’s kinda fun.

Most of my images were optimized down for an extra 3% savings, but one image had not been optimized at all! When squooshed it yielded a 49% smaller file for the same quality.

Images are the easy go-to resource for all apps, but if your app uses some other optimizable asset (PDFs, AI Models, Sparse Data), be sure to optimize and minimize those as well.
Decrease your App size and speed up your UI with a final optimization pass!
3. Remove Default Android permissions
You may or may not have had to add Android permissions as you built your app. However, your React Native project didn’t start at zero permissions. By default, the Android section has the following permissions:
- Internet (duh) — You’ll probably keep this
- System Alert — Debug mode uses this
- Read phone state — Not sure why this is on by default
- Read and Write external storage — You’ll probably keep this
- Check License — Used for Ads
You probably can remove some amount of these included permissions. Since they aren’t explicitly listed, it’s a little tricky, but the instructions are listed on the official docs page here.

4. Consider ProGuard and Hermes for Android
As of React Native version 0.60.4 — you’ve been given some options that (as of the time of this writing) are turned off. Both Hermes and ProGuard stand to improve your app but will require extensive testing.
Check ProGuard
If you haven’t turned on ProGuard, you may be missing an opportunity to optimize, obfuscate, and shrink your Android build. Once you turn on ProGuard, you should run all your automated tests to check for issues. There’s a reason it’s not on by default. However, you can usually find the correct ProGuard copy/paste needed to fix your new issues. Remember, this will only be testable in your actual Android releases by default, as it is a configuration under the release section.
So as a reminder, hook up your Android device and yarn/npx react-native run-android --variant=release to make sure everything is 👐
Official docs for enabling ProGuard on React Native
BONUS EXPERIMENT: When you turn on ProGuard, you might also try to turn on “shrinkResources”, which will shrink any external libraries on your behalf. ⚠ Test your release if you do this! Setting “shrinkResources” to true may completely break your images so don’t do this blindly. The setting is in the same file and usually goes together with ProGuard. More info here: https://developer.android.com/studio/build/shrink-code
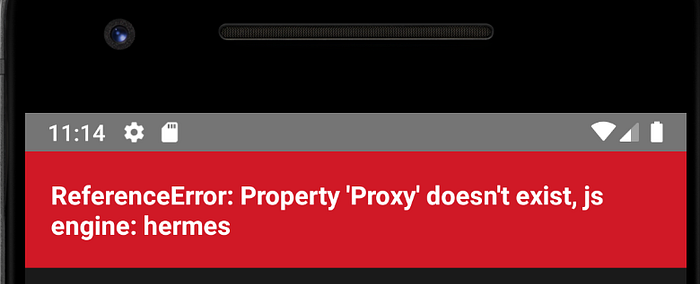
Check Hermes
Facebook announced Hermes at Chain React in 2019. Turning on Hermes will get you bytecode and improved startup! It’s actually quite easy to turn on. You’re not guaranteed that it will work with your app, but it’s worth experimenting.
About Hermes and how to enable it
WARNING: Depending on your version, Hermes might be as simple as flipping a switch, or it might simply not work. Most notably, support for Proxy was not in the original release, so MobX 5 (MobX 4 still works), Immer, and even Amplify apps were blocked from using Hermes. This problem will go away as Hermes support grows. AS OF THE TIME OF THIS WRITING there’s an release candidate for Hermes with Proxy support!
5. Quality Check It Yourself
“BUT GANT! I have a deadline! “ — Cool story yo, QA it yourself
“BUT GANT! I tested each part in great detail, so gluing it together will work!“ — Cool story yo, QA it yourself
“BUT GANT! I have a QA Team and Alpha/Beta testers for weeks! “ — Cool story yo, QA it yourself
A deep QA before shipping is a growing moment for any dev. No matter how tested an app is in dev, there’s always something in prod. You’ll get better and better at catching those as long as you force yourself to evaluate everything right before a release, and then swiftly find out what you missed.
I’m fine with cutting features to get a product out for all kinds of reasons, but a final and detailed QA pass cannot be cut. At the MINIMUM you need to poke through the sore spots and the strong spots of the app in a “walk-through the app” style of varying personas.
Especially if you turned on ProGuard, adjusted permissions, or enabled Hermes, it’s important to get a clean walk-through of every screen. Yes, automated tests can catch crashes, but we’ll be doing a deeper check.
As you do each walk-through, don’t forget to turn on Perf Monitor from your developer menu. We’ll be looking for JS FPS drops below 24, and let’s make sure RAM doesn’t slowly leak (basically that RAM number keeps creeping up).
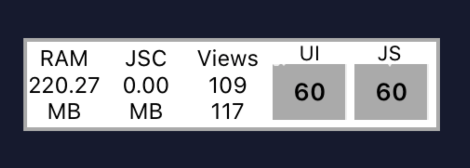
If you see any issues on the perf monitor, or at any point of the walk-throughs and you can recreate the issue, this means you’ve found a perfect problem to dig into with profiling.
This is also a good time to make sure everything is updating and hitting the correct production info for 3rd party services. As you walk-through the app, don’t walk through the app in staging, do your best to add/create from production where possible. If you have to use staging/test, assure you have a designated step to switch that out before shipping your app.
Min and Max Walk-throughs
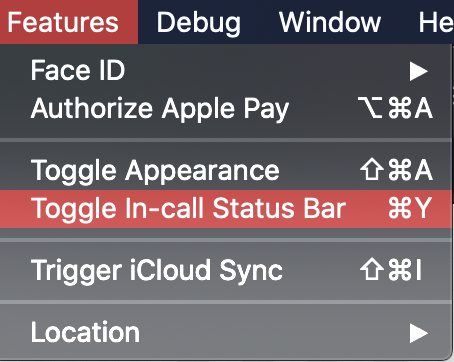
Test on the smallest sized supported device, and make it even smaller. For iOS Turn on In-Call Status Bar (with a no-notch simulator). This will really crunch your app’s workable space.
While viewing the smallest devices consider input forms and test all your KeyboardAvoidingView’s. It’s fair to say a device isn’t supported, but it should be a decision and not simply a consequence. Expect to move the Perf Monitor constantly throughout this test.
Then load the largest device you can, and pay attention to how far your fingers have to move. Keep an eye out for issues with image quality or broken layouts.
Internet Issues Walk-through
Test the app with little and no internet. The “no internet” should be tested at not-so-random moments. You can probably assert specific moments where losing Internet would be especially problematic. Try to cause those issues.
To do this on Mac you can use the Network Link Conditioner tool.
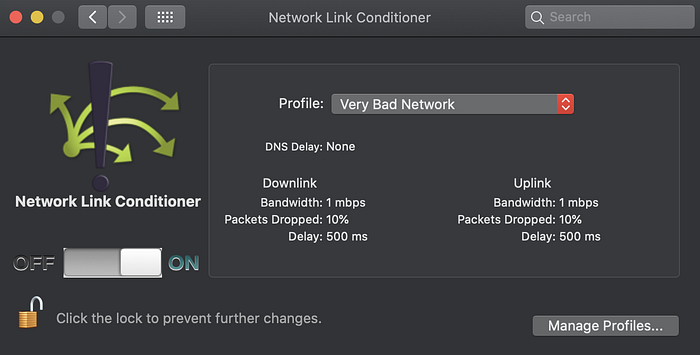
If you don’t have this tool, you can download it easily. Here are the directions on how to get it. Thanks, NS Hipster!
Accessibility (A11y) Walk-throughs
Firstly, and simply, make sure you have all the accessibility labels and hints in place. You might be completely unfamiliar with this, and if you are, take a beat to read up on React Native Accessibility, and then go implement it all. Don’t ship your app with zero accessibility.
On iOS set the system text to be larger and then peruse your app looking for clip-off points to make sure no critical text gets pushed/clipped. If you increase the font size enough, you’ll HAVE to lose some text, but it’s good to know how fragile your app is to text sizes.
If you see issues in your app with small bumps in text size, you can either fix the issue or hit that Text component with allowFontScaling={false} as needed.
Lastly, when doing a physical device walk-through, lower the brightness of your phone, and use your app. This will help you identify any low-contrast sections that could be problematic for people with limited eyesight. As an anecdote, I have an app on my iPhone called “Unfollow” and the contrast for dark mode is so bad, I simply cannot use the app in any dark room.
6. Check Startup Performance Issues
At the time of this writing, your entire JavaScript bundle has to be loaded before your app can start, unless you enabled Hermes. So if your app has a very expensive component at any point, your whole app has to wait for it, OR if your app has tons of screens, all of them have to load before you can show your first.
This is a great thing to check for on your final rollout because these don’t appear costly until you’re nearing the end of your app.
Checking on Bundle Size:
Let’s generate our JavaScript bundles from the command line so we can do a quick check on the file-size. These two commands should work:
If you’re under 10MB, consider your app pretty golden! If you’re creeping up to 50MB, you should consider RAM bundles. RAM bundles are particularly useful for delaying load costs for screens that are far from loading or are generally never loaded. This can significantly improve your application load time.
Considering Inline Requires
Imports load right away, while a require can help you delay that cost until it’s needed. If your app has a particularly expensive component that you don’t access right away, consider moving that component to an inline require for a boost in app-startup speed.
“But Gant! By that logic, what about turning EVERYTHING into an inline require!?” — Great idea! Are you on version > 0.59?
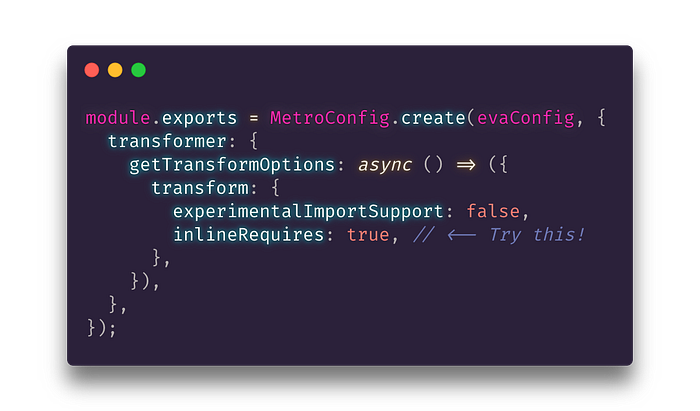
The amazing people at FaceBook (special thanks for the heads up Eli White) are currently experimenting with a metro config that automagically 🎩🐇 turns everything into an inline require. Soon to be turned on by default!
Open up your metro.config.js and check if inlineRequires is turned on or not. Apps with a deep and varied component architecture will see the most improvement.
Checking APK Size — Consider ABI Splitting
Now you know the file size of your Android APK. You can compare it against other APK bundles. The average Google Play APK is 11.5 MB, but it’s not uncommon to ship apps around 30 MB. If optimization is on your plate, it might be worth sizing your app down with ABI splitting.
APKs support all kinds of phones and resolutions, so ABI splitting lets you build multiple APKs, each for a specific architecture and with some extra work, each resolution combo.
Out the box, React Native ships with some ABI options which can shave off about 4 MB for free from your app. Your build.gradle has the option enableSeparateBuildPerCPUArchitecture which is set to false by default. If you turn this on, you can get two APKs, one for ARM and one for x86 devices. Upload them both, and the right phones will get the right files via Google Play.
7. Bulletproof Your App
At this point, you’ve tested and checked your app for all kinds of issues, and you’re almost ready to send your app off into the wild. However, you can’t leave it how it is, there’s one critical step we have to assure exists.

You might think you already have this covered. I’m sure you probably have something like App Center, or Firebase Crashlytics etc. in your app to alert you to ALL fun app crashes your users experience. However, we should take a minute and talk about what that crash looks like.
The concept of the graceful exit is an understated critical coding imperative. Most apps are shipped with elegant manners covering a seething underbelly that will flip the dinner table the second anything goes wrong.
A production crash in a default React Native app simply closes the app leaving your users at their home screen wondering, WTF? My favorite is when this is persisted so it’s right when an app loads, effectively gas-lighting your users into wondering if they actually clicked the icon.
By “Bulletproofing” your app, we’re going to make those inevitable failures a non-traumatizing experience.
Gotta Catch’em All
It’s time to do a few searches in your code. Do you use TODO in your comments? Search through and make sure you don’t have anything significant sitting around. Maybe a few checks “Lorem” wouldn’t hurt either 🤪
More importantly, do a search in your code for places where your app COULD have an issue and patch them with errors you hope your user will never see. All your JS Promises should have a “catch” and awaits for 3rd party services should be wrapped in “try”. If one feature of an app fails, that is tolerable, but having the whole app close and lose progress is not.

I hear you. The engineer inside you is saying “Is this just sweeping what’s left under the rug?” and my answer to that is Yes. Because it’s the wrong place and the wrong time to have this happen on a user’s device.
I know the “junk drawer” is looked down upon, but that doesn’t stop the fact that every house has one. Fail gracefully with catch, and move on with your app. Users aren’t QA.
Assure a Crash Message
When a JavaScript or a Native fatal error happens in production, it’s nice to tie in your crash/analytics for catching the details, but it’s even better to let the user know something just went wrong.
For this, I generally use React Native Exception Handler. The library gives me a spot to run some arbitrary code, and if the error was at the JavaScript level, and not the Native level, you can even show the user a nice UI apologizing.

If you have a global exception handler from your crash detection software, you should set the third parameter to true. When the error is Native, you can still run some JavaScript, but just no UI reports.
At the time of this writing, the repo and README are still set up for the older style (< 0.6x) manual linking, but you can easily manually link this project to a newer RN project. I successfully added it to a v0.62.2 with minimal hiccups.
8. Disable Arbitrary URLs in iOS
In iOS 9, Apple enabled App Transport Security (ATS), which requires any communication to be secured with HTTPS. ATS blocks connections that fail to meet minimum security specifications. By default, React Native projects have an exception built in so they can read bundles locally.
Now that your app is ready to ship, you’ll probably need to remove that exception. It’s not an exact science, but the fewer rules you bend, the more likely you are to cruise through the App Store evaluation.
Unfortunately, you’ll have to put everything right back where you had it when you start developing again. I’ll generally flip this off, build a release for iOS, and put it right back with undo.
Your Info.plist is located in /ios/<your app>/Info.plist and you can remove the localhost exception like so:

If this seems annoying, and to be honest it is! BUT, you can automate this away and save yourself the headache.
Thanks for the suggestion Jeff! It’s definitely something I’d love to have setup right away! It looks like you can modify the info.plist with Fastlane! I’ll definitely add that!
Welp folks! You’ve reached the end of the blog post! So that means…
Voila! You’re ready to ship your React Native app! 🚢
Hopefully, you learned a lot, or a little about the final steps for any React Native app you’re planning to ship. If so, hold down that clap button!
If you’re looking to hire some pros to help you build, test, or ship your app, consider contacting us at Infinite Red. You can get in touch with an email to hello@infinite.red, and we’re happy to chat about your React Native needs. Delivering quality, high-impact applications is what we do.


Gant Laborde is a co-owner and Chief Innovation Officer at Infinite Red, published author, adjunct professor, worldwide public speaker, and mad scientist in training. Clap/follow/tweet or visit him at a conference.